User Guide
Welcome to the user guide of MediConnect!
MediConnect is a clinic management system (CMS) application designed for clinic receptionists. It aims to help them to be more efficient and effective at accomplishing administrative tasks.
These administrative tasks can include:
- Scheduling an appointment
- Retrieving a patient’s medical history
- Checking a doctor’s availability
- Updating a patient’s medical record
If you are new to this guide, click here for a quick introduction to this user guide.
If you are keen to start using MediConnect, click here for our quick start guide.
Table of Contents
- Table of Contents
- Introduction to this user guide
- Quick start
-
Features
- Parameters used in this guide
-
Patient Management Features
- Adding a patient:
add_p - Listing all patients :
list_p - Viewing details of a patient :
view_p - Editing a patient :
edit_p - Locating patients by name :
find_p - Deleting a patient :
delete_p - Adding a medical condition to a patient :
add_tag_p - Deleting a medical condition from a patient :
delete_tag_p - Editing the remark of a patient :
remark_p
- Adding a patient:
-
Doctor Management Features
- Adding a doctor :
add_d - Listing all doctors :
list_d - Viewing details of a doctor :
view_d - Editing a doctor :
edit_d - Locating doctors by name :
find_d - Deleting a doctor :
delete_d - Adding a specialisation to a doctor :
add_tag_d - Deleting a specialisation from a doctor :
delete_tag_d - Editing the remark of a doctor :
remark_d
- Adding a doctor :
-
Appointment Management Features
- Adding an appointment :
add_a - Listing all appointments, or by patient or doctor NRIC :
list_a - Editing an appointment :
edit_a - Viewing details of an appointment :
view_a - Deleting an appointment :
delete_a - Adding a prescription to an appointment :
add_tag_a - Deleting a prescription from an appointment :
delete_tag_a - Editing the remark of an appointment :
remark_a
- Adding an appointment :
- General Features
- FAQ
- Known issues
- Command summary
Introduction to this user guide
This guide is designed for users of all level to master their use of MediConnect.
Icons used in this guide
Here are some common icons used throughout this user guide.
| Icons | Representation |
|---|---|
|
|
Provides you with additional useful information |
|
|
Warns you on the common mistakes |
|
|
Provides you with tips to enhance your experience |
Terms used in this guide
Here are some common terms used throughout this user guide.
| Terms | Representation |
|---|---|
| Command | The instruction you enter into the application |
| Parameter | The additional information you provide for the instruction you intend to enter |
| Appointment | A scheduled medical consultation between the patient and the doctor |
| MAX_INT | Integer value 2147483647 |
| Command Terminal | A window into which users can type commands that are then executed by their computer’s operating system |
Navigating this user guide
As this guide aims to be as comprehensive as possible, you might find the amount of information in this user guide overwhelming. Fret not, you can utilise the Table of Content to find the information you are looking for.
If you are new to MediConnect, you can head over to our quick start to learn the basics of this application.
If you are familiar with MediConnect, you can head over to view the list of features or the command summary to hone your MediConnect skills.
Back to Table of Contents.
Quick start
Installing MediConnect
-
Ensure you have Java
11or above installed in your Computer. If you already have it installed, follow this guide to check your Java version.If you do not have it installed yet or your Java version is below
11, refer to the following guides based on your operating system: -
Download the latest
mediconnect.jarfrom here. -
Copy the file to the folder you want to use as the home folder for your MediConnect.
-
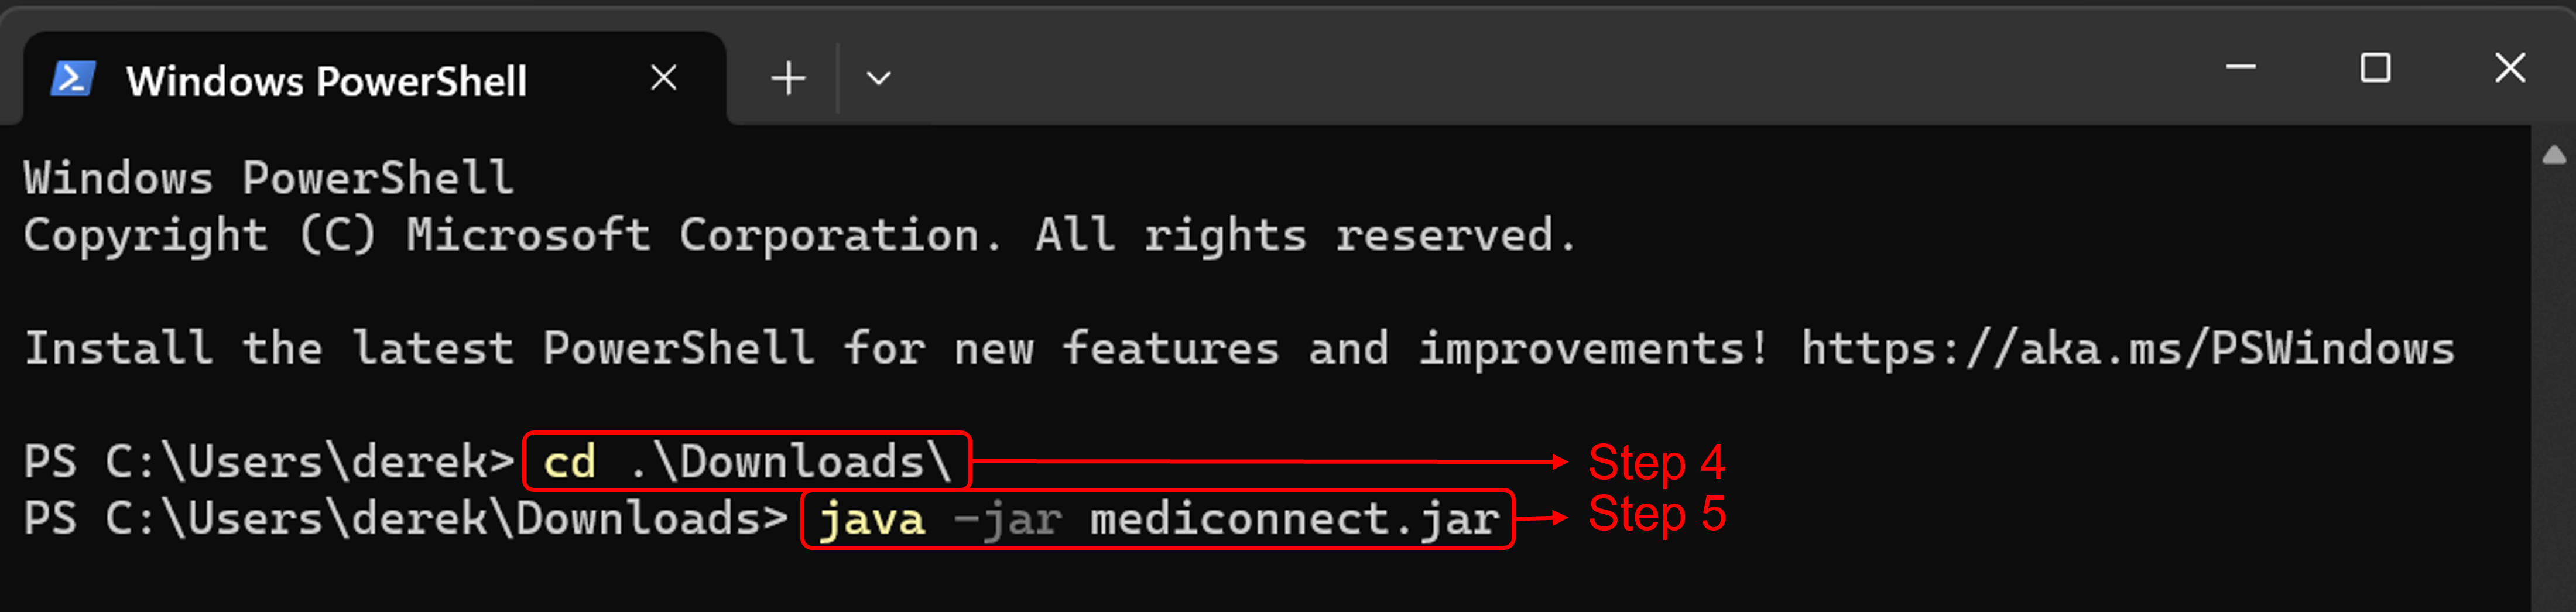
Open a command terminal,
cdinto the folder you put the jar file in -
Use the
java -jar mediconnect.jarcommand to run the application.The commands you give should look similar to what is shown below:
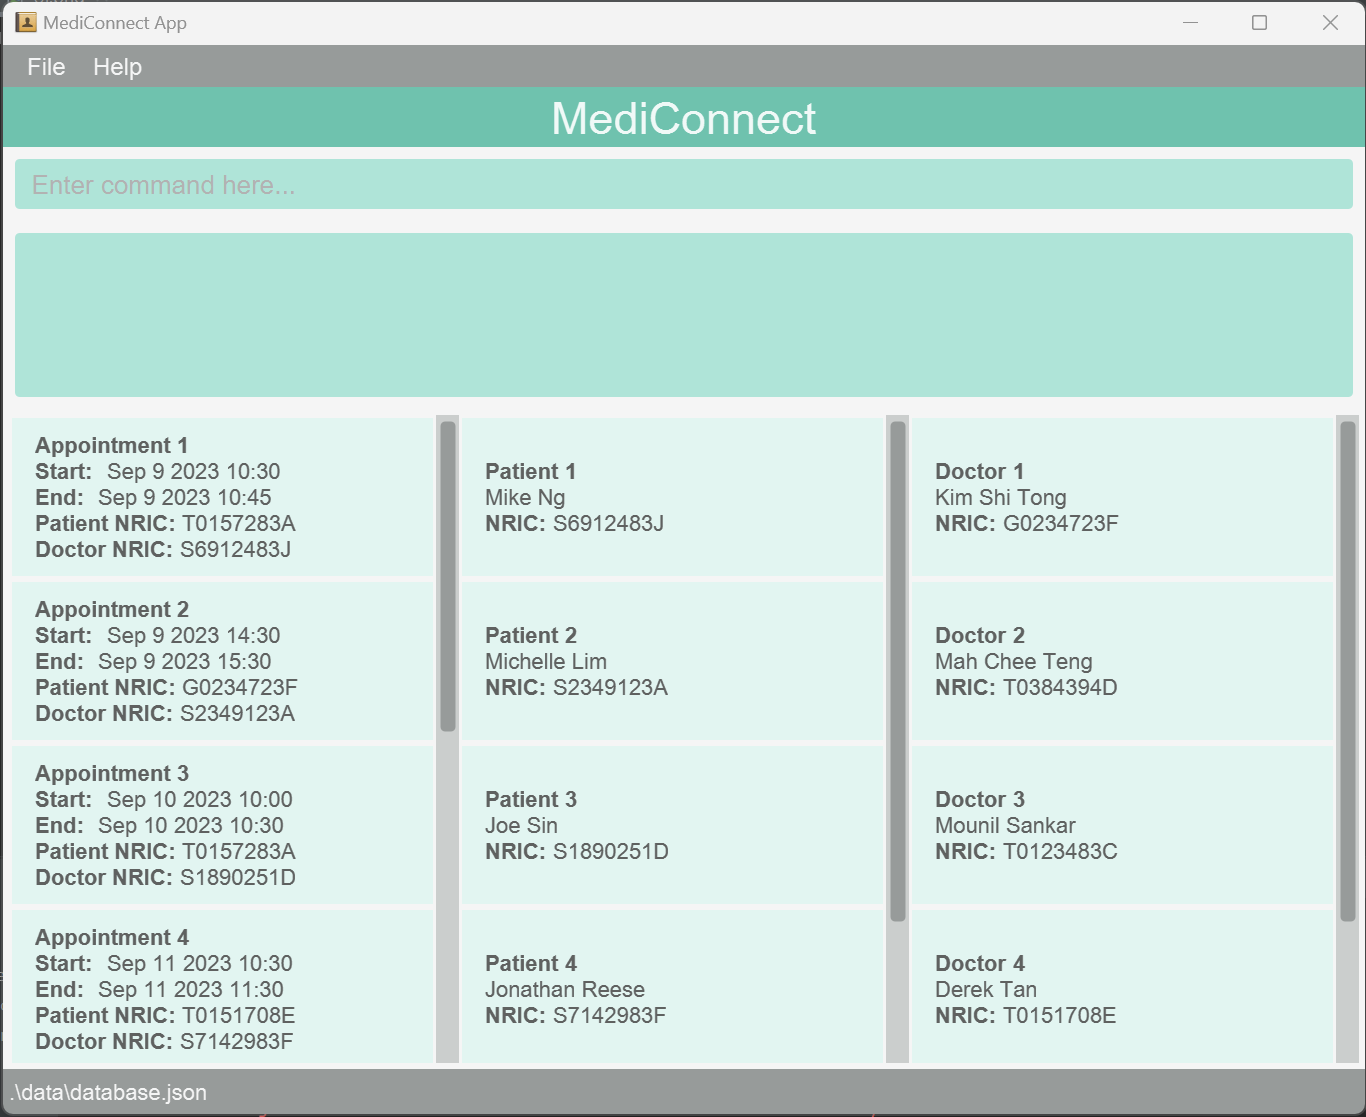
A GUI similar to the below should appear in a few seconds. Note how the app contains some sample data.
-
Type the command in the command box and press Enter to execute it. e.g. typing
helpand pressing Enter will open the help window.
Some example commands you can try:-
list_a: Lists all appointments. -
add_p n\Joe Ng ic\T0383462A p\83745623: Adds a patient namedJoe Ngto the list of patients. -
delete_d 5: Deletes the 5th doctor in the list of doctors. -
exit: Exits the app.
-
-
Refer to the Features below for details of each command.
Back to Table of Contents.
Navigating the application
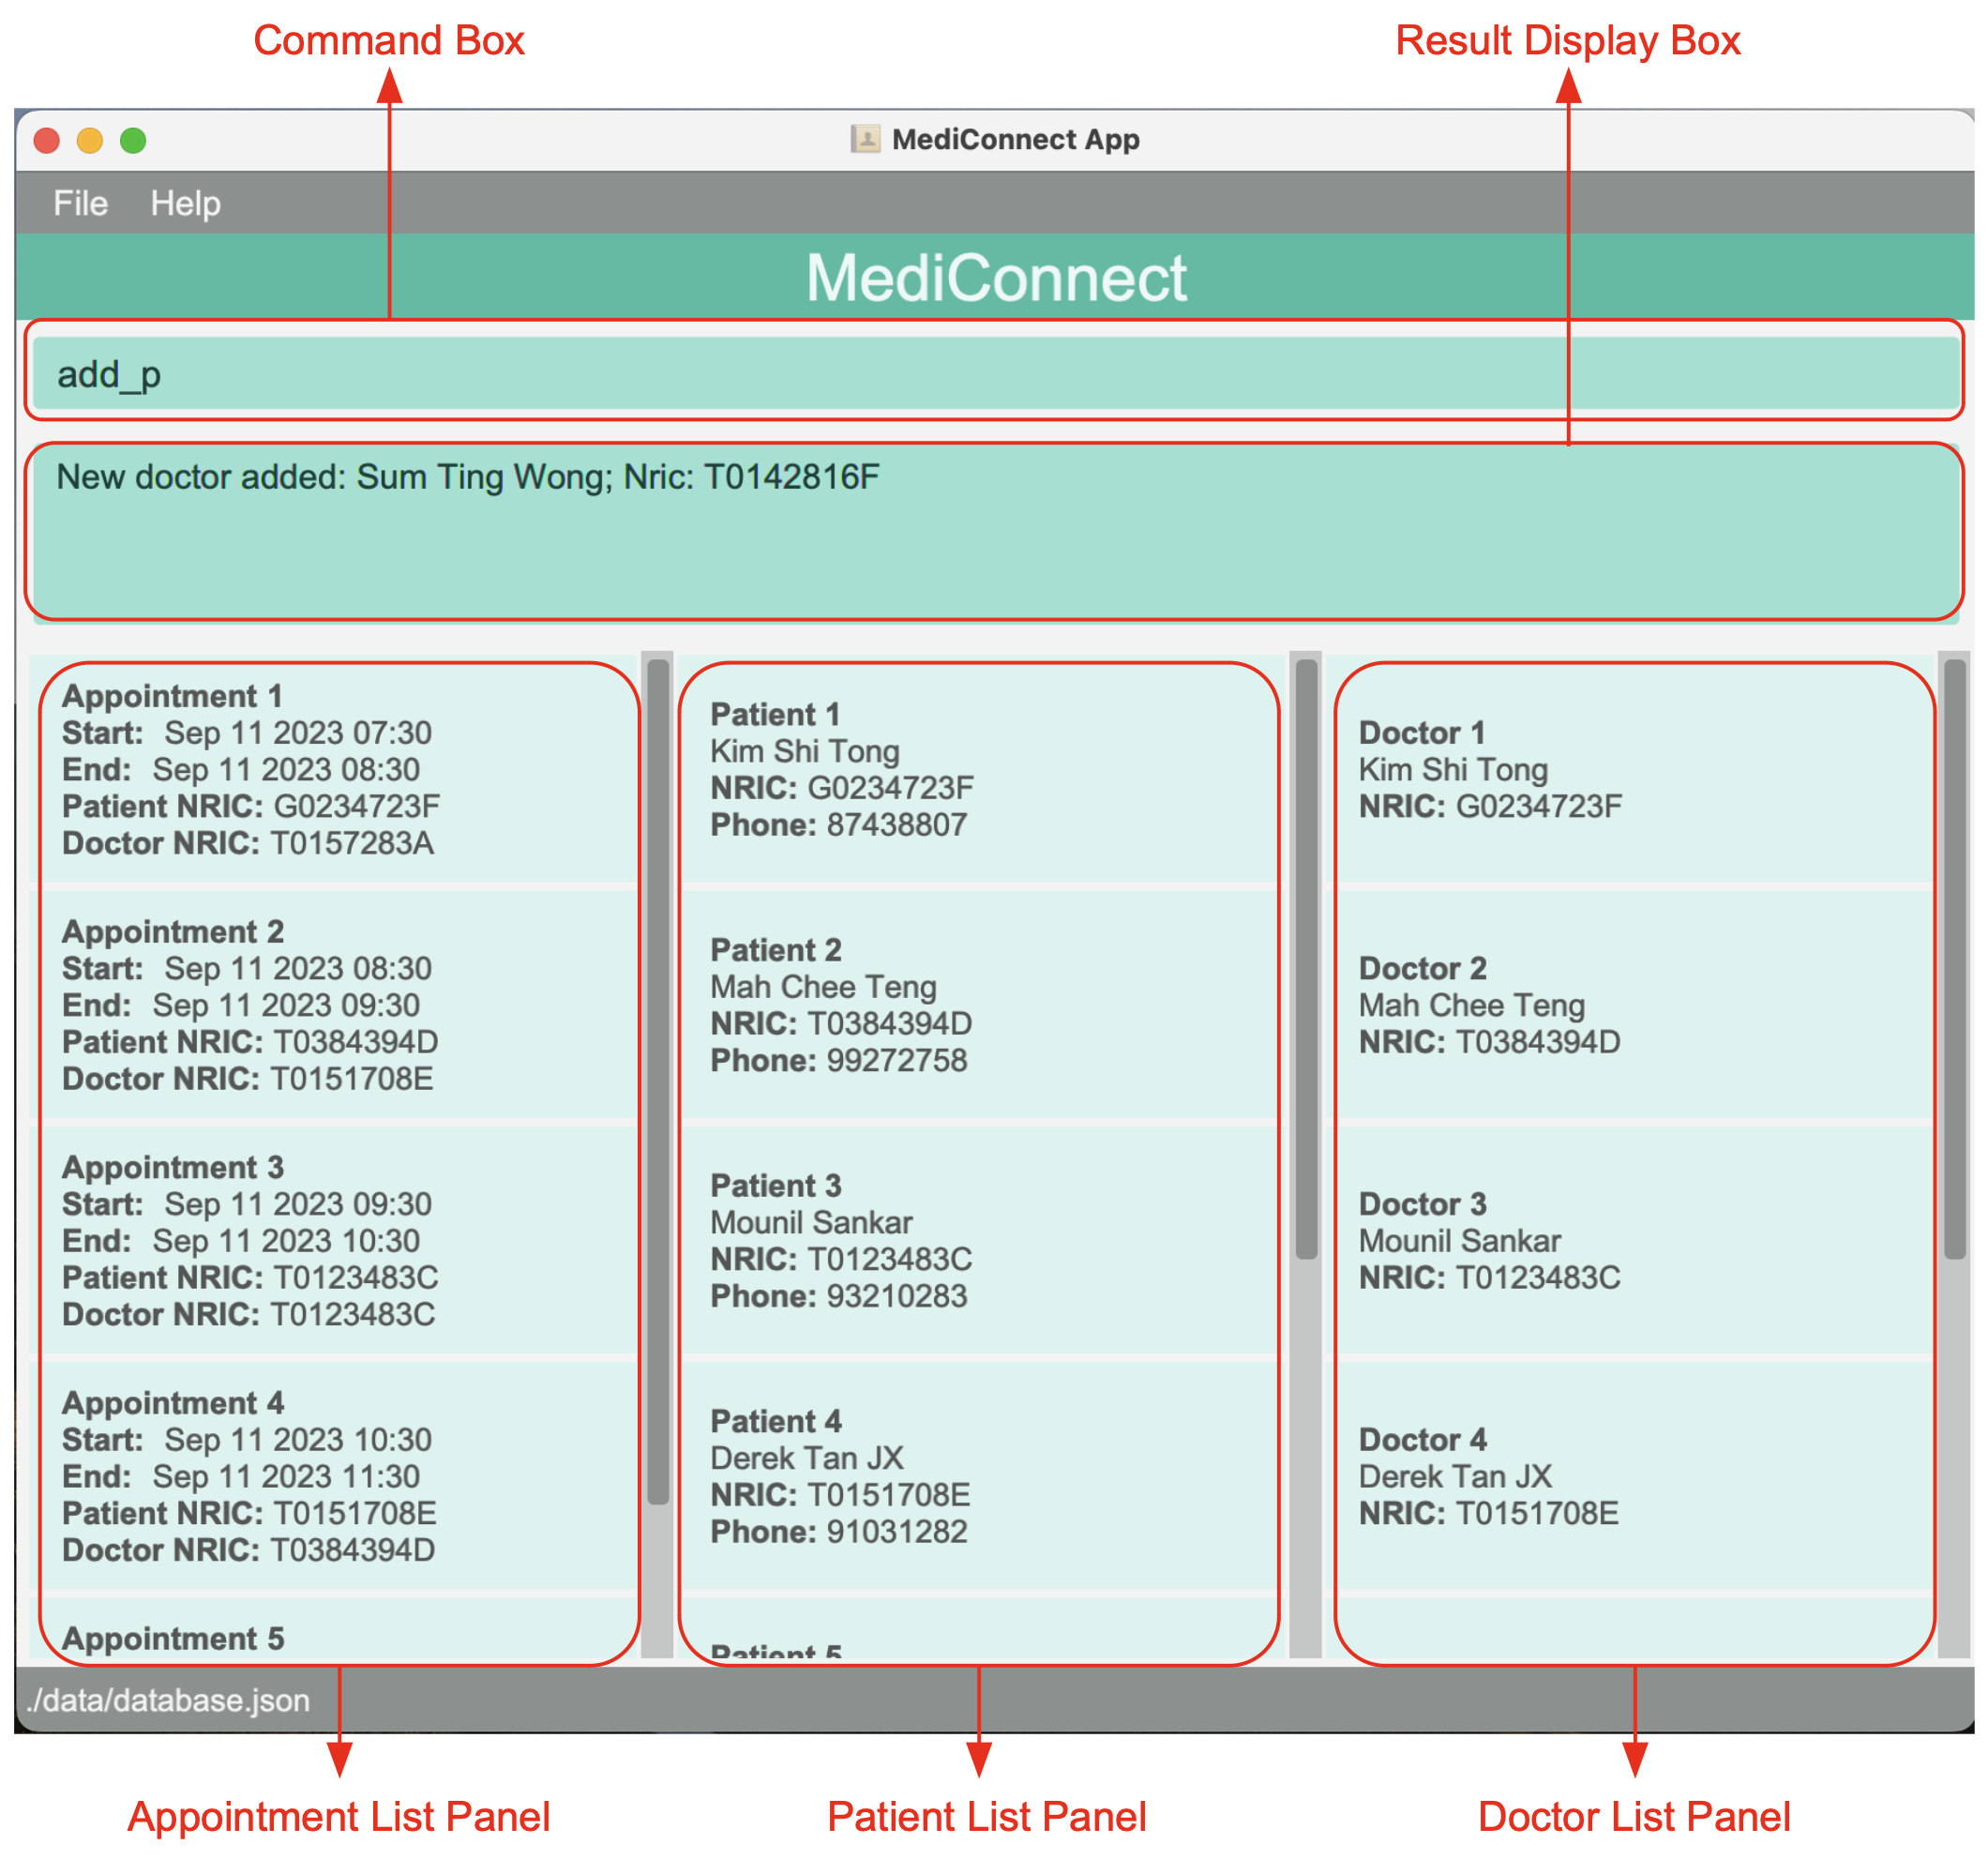
The main window has the following components:
- Command Box: The command box is where you will enter your commands
- Result Display Box: This box will display the output messages in response to your commands
- Appointment List Panel: This panel will display the list of filtered appointments
- Patient List Panel: This panel will display the list of filtered patients
- Doctor List Panel: This panel will display the list of filtered doctors
Back to Table of Contents.
Features
The features are categorised into:
- Patient Management Features
- Doctor Management Features
- Appointment Management Features
- General Features
![]() Notes about the command format:
Notes about the command format:
-
Words in
UPPER_CASEare the parameters you would need to provide.
e.g. inadd n\NAME,NAMEis a parameter which can be used asadd n\John Doe. -
Parameters in square brackets are optional.
e.g. forINDEX [dic\DOCTOR_NRIC] [pic\PATIENT_NRIC], bothDOCTOR_NRICandPATIENT_NRICare optional. Valid inputs include3 dic\T1023470J pic\S1875409K,3 pic\S1875409Kor even3. -
Parameters can be entered in any order.
e.g. if the command specifiesn\NAME p\PHONE_NUMBER,p\PHONE_NUMBER n\NAMEis also acceptable. -
Extraneous parameters for commands that do not take in parameters (such as
help,list_pandexit) will be ignored.
e.g. if the command specifieshelp 123, it will be interpreted ashelp. -
If you are using a PDF version of this document, be careful when copying and pasting commands that span multiple lines as space characters surrounding line-breaks may be omitted when copied over to the application.
Parameters used in this guide
The following table gives an overview of what each parameter used in the Features section is for.
| Parameter | Description | Valid Parameter Input |
|---|---|---|
| NAME | The full name of the doctor/patient | Only accepts alphanumeric characters and spaces |
| NRIC | The National Registration Identity Card number or Foreign Identification Number of the doctor/patient | Starts with S/T/F/G/M and followed by 7 digits and ends with an alphabet. The first and last letter is case insensitive |
| PHONE_NUMBER | The phone number of the doctor/patient | Only contain numbers, and it should be at least 3 digits long |
| INDEX | The position of the appointment/doctor/patient in the filtered list | Must be a positive integer (1, 2, 3, …) and should not be larger than the length of the list and have a maximum possible value of MAX_INT |
| MEDICAL_CONDITION | The medical condition of the patient | Only accepts alphanumeric characters without any spaces |
| SPECIALISATION | The specialisation of the doctor | Only accepts alphanumeric characters without any spaces |
| PRESCRIPTION | The prescription of the appointment | Only accepts alphanumeric characters without any spaces |
| START_TIME | The start time of the appointment | Only accepts valid dates in the format YYYY-MM-DD HH:MM |
| END_TIME | The end time of the appointment | Only accepts valid dates in the format YYYY-MM-DD HH:MM |
| REMARK | The remark of the appointment/patient/doctor | Accepts all input |
| KEYWORD | The keyword of doctor/patient | Accepts all input |
Back to Table of Contents.
Patient Management Features
This is the list of features that help you manage patient records:
- Adding patient
- Listing patient
- Viewing patient
- Editing patient
- Finding patient
- Deleting patient
- Adding a medical condition to a patient
- Deleting a medical condition from a patient
- Editing the remark of a patient
Back to Table of Contents.
Adding a patient: add_p
Allows you to add a patient to the system.
Format: add_p n\NAME ic\NRIC p\PHONE_NUMBER
Examples:
-
add_p n\John Doe ic\T0212385J p\98765432adds a new patient namedJohn Doewith NRICT0212385Jand phone98765432into the database. -
add_p ic\S9912343G n\Betsy Crowe p\81235833adds a new patient namedBetsy Crowewith NRICS9912343Gand phone81235833into the database.
Sample Usage:
-
Assuming you want to add a Patient named “Jonathan Reese” with NRIC “S8712461K” and phone number “81573238”.
- Enter the following command:
add_p n\Jonathan Reese ic\S8712461K p\81235833 - The result box will display the following message:
New patient added: Jonathan Reese; Phone: 81235833; NRIC: S8712461K - You have successfully added the patient to the database.
Back to Patient Management Features.
Listing all patients : list_p
Allows you to list all patients in the system.
Format: list_p
Back to Patient Management Features.
Viewing details of a patient : view_p
Allows you to view details, such as basic information, medical condition, and remark, of a specific patient in the system.
Format: view_p INDEX
- Displays the full details of the patient at the specified
INDEX. - The index refers to the index number shown in the displayed patient list.
- The index must be a positive integer (i.e. 1 to MAX_INT).
- The index should not be larger than the length of the displayed patient list.
view_p to update the Patient Window.Examples:
- Entering
list_pfollowed byview_p 2shows the details of the 2nd patient in the patient list. - Entering
find_p Jonathanfollowed byview_p 1shows the details of the 1st patient in the resultant patient list of thefind_pcommand.
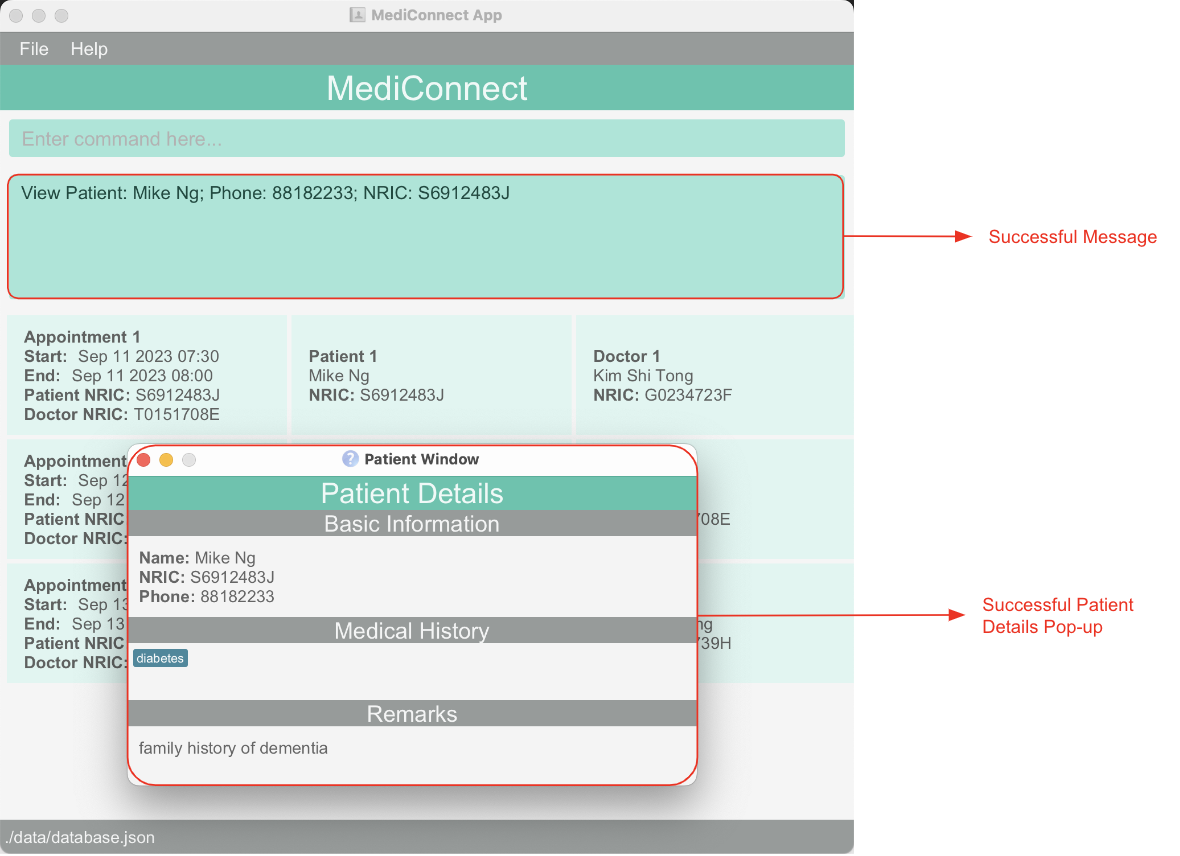
Below is an example of a successful view command call.
Back to Patient Management Features.
Editing a patient : edit_p
Allows you to edit an existing patient in the system. This is useful to correct any mistakes made when adding or updating a patient.
Format: edit_p INDEX [n\NAME] [ic\NRIC] [p\PHONE]
- Edits the patient at the specified
INDEX. - The index refers to the index number shown in the displayed patient list.
- The index must be a positive integer (i.e. 1 to MAX_INT).
- The index should not be larger than the length of the displayed patient list.
- At least one of the optional fields must be provided.
- Existing values will be updated to the input values.
Examples:
-
edit_p 1 n\Joe Ngedits the name of 1st patient in the patient list to beJoe Ng. -
edit_p 2 p\91234567edits the phone of the 2nd patient in the patient list to be91234567.
Sample Usage:
-
Assuming you want to edit the 4th patient changing his phone from “81235833” to “81453894”.
- Enter the following command:
edit_p 4 p\81453894 - The result box will display the following message:
Edited Patient: Jonathan Reese; Phone: 81453894; NRIC: S8712461K - You have successfully edited the patient in the database.
Back to Patient Management Features.
Locating patients by name : find_p
Allows you to find patients whose name contains any of the given keywords.
Format: find_p KEYWORD [MORE_KEYWORDS]
- The search is case-insensitive. e.g.
hanswill matchHans. - The order of the keywords does not matter. e.g.
Hans Bowill matchBo Hans. - Only the name of the patient is searched.
- Only full words will be matched e.g.
Hanwill not matchHans. - Patients matching at least one keyword will be returned (i.e.
ORsearch). e.g.Hans Bowill returnHans Gruber,Bo Yang.
Examples:
-
find_p JohnreturnsjohnandJohn Doe. -
find_p alex davidreturnsAlex Yeoh,David Li.
Back to Patient Management Features.
Deleting a patient : delete_p
Allows you to delete a specified patient from the system.
Format: delete_p INDEX
- Deletes the patient at the specified
INDEX. - The index refers to the index number shown in the displayed patient list.
- The index must be a positive integer (i.e. 1 to MAX_INT).
- The index should not be larger than the length of the displayed patient list.
Examples:
- Entering
list_pfollowed bydelete_p 2deletes the 2nd patient in the patient list. - Entering
find_p Jonathanfollowed bydelete_p 1deletes the 1st patient in the resultant patient list of thefind_pcommand.
Back to Patient Management Features.
Adding a medical condition to a patient : add_tag_p
Allows you to add a medical condition to a specified patient in the system.
Format: add_tag_p INDEX t\MEDICAL_CONDITION
- Adds the given medical condition to the patient at the specified
INDEX. - The index refers to the index number shown in the displayed patient list.
- The index must be a positive integer (i.e. 1 to MAX_INT).
- The index should not be larger than the length of the displayed patient list.
- Only one medical condition can be added at a time.
Examples:
- Entering
list_pfollowed byadd_tag_p 2 t\diabetesadds the medical conditiondiabetesto the 2nd patient in the patient list. - Entering
find_p Jonathanfollowed byadd_tag_p 1 t\canceradds the medical conditioncancerto the 1st patient in the resultant patient list of thefind_pcommand.
Back to Patient Management Features.
Deleting a medical condition from a patient : delete_tag_p
Allows you to delete a medical condition from a specified patient in the system.
Format: delete_tag_p INDEX t\MEDICAL_CONDITION
- Deletes the input medical condition from the patient at the specified
INDEX. - The index refers to the index number shown in the displayed patient list.
- The index must be a positive integer (i.e. 1 to MAX_INT).
- The index should not be larger than the length of the displayed patient list.
- The given
MEDICAL_CONDITIONmust be a present medical condition of the specified patient. - Only one medical condition can be deleted at a time.
Examples:
- Entering
list_pfollowed bydelete_tag_p 2 t\diabetesdeletes the medical conditiondiabetesfrom the 2nd patient in the patient list. - Entering
find_p Jonathanfollowed bydelete_tag_p 1 t\cancerdeletes the medical conditioncancerfrom the 1st patient in the resultant patient list of thefind_pcommand.
Back to Patient Management Features.
Editing the remark of a patient : remark_p
Allows you to edit the remark of a specified patient in the system. The patient’s remark can be used to store temporary information such as family health history and current medications/treatments the patient is on.
Format: remark_p INDEX [r\REMARK]
- Edits the remark of the patient at the specified INDEX.
- The index refers to the index number shown in the displayed patient list.
- The index must be a positive integer (i.e. 1 to MAX_INT).
- The index should not be larger than the length of the displayed patient list.
- The patient’s existing remark will be overwritten with the input
REMARK. - An empty
REMARKinput will delete the previously stored remark. - Similarly, if the
REMARKparameter is not given, it will delete the previously stored remark.
Examples:
- Entering
list_pfollowed byremark_p 2 r\need follow upoverwrites the existing remark of the 2nd patient in the patient list withneed follow up. - Entering
find_p Jonathanfollowed byremark_p 1orremark_p 1 r\removes the existing remark from the 1st patient in the resultant patient list of thefind_pcommand.
Back to Patient Management Features.
Doctor Management Features
This is the list of features that help you manage doctor records:
- Adding doctor
- Listing doctor
- Viewing doctor
- Editing doctor
- Finding doctor
- Deleting doctor
- Adding a Specialisation to a doctor
- Deleting a Specialisation from a doctor
- Editing the Remark of a doctor
Back to Table of Contents.
Adding a doctor : add_d
Allows you to add a doctor to the system.
Format: add_d n\NAME ic\NRIC
Examples:
-
add_d n\John Doe ic\T0212385Jadds a new doctor namedJohn Doewith NRICT0212385Jinto the database. -
add_d ic\S9912343G n\Betsy Croweadds a new doctor namedBetsy Crowewith NRICS9912343Ginto the database.
Sample Usage:
-
Assuming you want to add a doctor named “John Doe” with NRIC “T0212385J”.
- Enter the following command:
add_d n\John Doe ic\T0212385J - The result box will display the following message:
New doctor added: John Doe; Nric: T0212385J - You have successfully added the doctor to the database.
Back to Doctor Management Features.
Listing all doctors : list_d
Allows you to list all the doctors in the system.
Format: list_d
Back to Doctor Management Features.
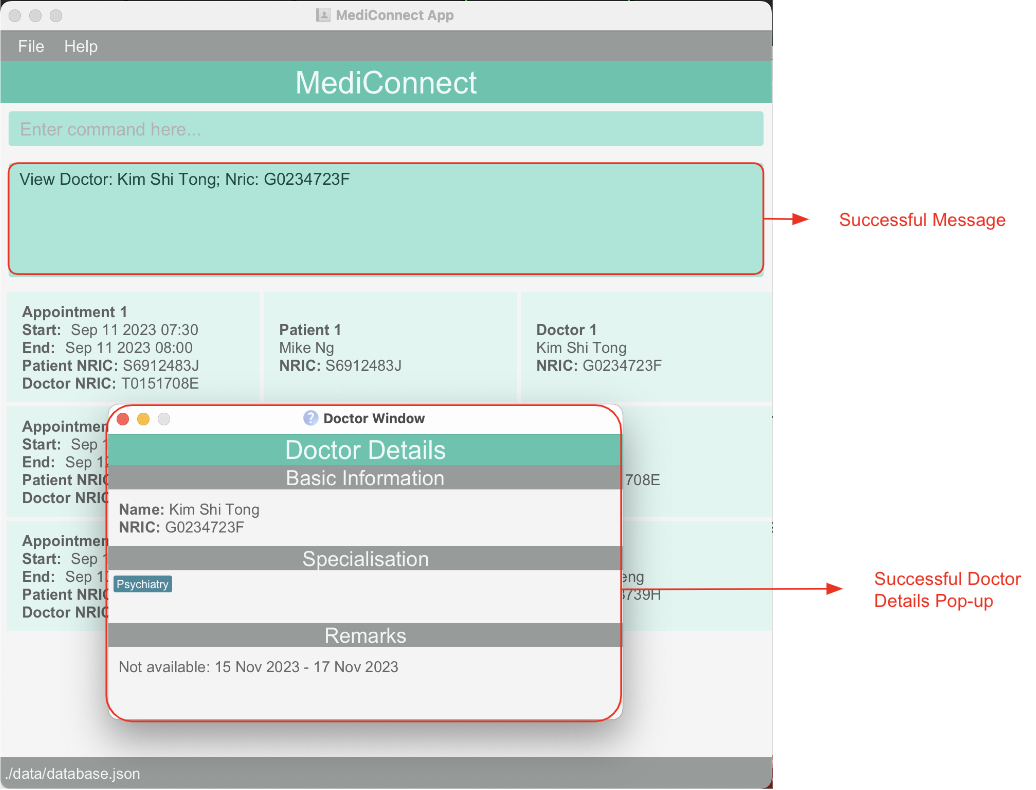
Viewing details of a doctor : view_d
Allows you to view details, such as basic information, specialisation, and remark, of a specific doctor in the system.
Format: view_d INDEX
- Displays the full details of the doctor at the specified
INDEX. - The index refers to the index number shown in the displayed doctor list.
- The index must be a positive integer (i.e. 1 to MAX_INT).
- The index should not be larger than the length of the displayed doctor list.
view_d to update the Doctor Window.Examples:
- Entering
list_dfollowed byview_d 2shows the details of the 2nd doctor in the doctor list. - Entering
find_d Jonathanfollowed byview_d 1shows the details of the 1st doctor in the resultant doctor list of thefind_dcommand.
Below is an example of a successful view command call.
Back to Doctor Management Features.
Editing a doctor : edit_d
Allows you to edit an existing doctor in the system. This is useful to correct any mistakes made when adding or updating a doctor.
Format: edit_d INDEX [ic\NRIC] [n\NAME]
- Edits the doctor at the specified
INDEX. - The index refers to the index number shown in the displayed doctor list.
- The index must be a positive integer (i.e. 1 to MAX_INT).
- The index should not be larger than the length of the displayed doctor list.
- At least one of the optional fields must be provided.
- Existing values will be updated to the input values.
Example:
-
edit_d 1 n\Joe Ng ic\T0212385Jedits the name and NRIC of the 1st doctor in the doctor list to beJoe NgandT0212385Jrespectively.
Sample Usage:
-
Assuming you want to edit the 4th doctor changing his NRIC from “T0212384J” to “T0212385J”.
- Enter the following command:
edit_d 4 ic\T0212385J - The result box will display the following message:
Edited Doctor: Joe Ng; Nric: T0212385J - You have successfully edited the doctor in the database.
Back to Doctor Management Features.
Locating doctors by name : find_d
Allows you to locate doctors whose name contains any of the given keywords.
Format: find_d KEYWORD [MORE_KEYWORDS]
- The search is case-insensitive. e.g.
hanswill matchHans. - The order of the keywords does not matter. e.g.
Hans Bowill matchBo Hans. - Only the name of the doctor is searched.
- Only full words will be matched e.g.
Hanwill not matchHans. - Doctors matching at least one keyword will be returned (i.e.
ORsearch). e.g.Hans Bowill returnHans Gruber,Bo Yang.
Examples:
-
find_d JohnreturnsjohnandJohn Doe. -
find_d alex davidreturnsAlex Yeoh,David Li.
Back to Doctor Management Features.
Deleting a doctor : delete_d
Allows you to delete a specific doctor from the system.
Format: delete_d INDEX
- Deletes the doctor at the specified
INDEX. - The index refers to the index number shown in the displayed doctor list.
- The index must be a positive integer (i.e. 1 to MAX_INT).
- The index should not be larger than the length of the displayed doctor list.
Examples:
- Entering
list_dfollowed bydelete_d 2deletes the 2nd doctor in the doctor list. - Entering
find_d Jonathanfollowed bydelete_d 1deletes the 1st doctor in the resultant doctor list of thefind_dcommand.
Back to Doctor Management Features.
Adding a specialisation to a doctor : add_tag_d
Allows you to add a specialisation to a specified doctor in the system.
Format: add_tag_d INDEX t\SPECIALISATION
- Adds the specialisation to the doctor at the specified
INDEX. - The index refers to the index number shown in the displayed doctor list.
- The index must be a positive integer (i.e. 1 to MAX_INT).
- The index should not be larger than the length of the displayed doctor list.
- Only one specialisation can be added at a time.
Examples:
- Entering
list_dfollowed byadd_tag_d 2 t\Orthopaedicadds theOrthopaedicspecialisation to the 2nd doctor in the doctor list. - Entering
find_d Jonathanfollowed byadd_tag_d 1 t\Orthopaedicadds theOrthopaedicspecialisation to the 1st doctor in the resultant doctor list of thefind_dcommand.
Back to Doctor Management Features.
Deleting a specialisation from a doctor : delete_tag_d
Allows you to delete a specialisation from a specific doctor in the system.
Format: delete_tag_d INDEX t\SPECIALISATION
- Deletes the specialisation from the doctor at the specified
INDEX. - The index refers to the index number shown in the displayed doctor list.
- The index must be a positive integer (i.e. 1 to MAX_INT).
- The index should not be larger than the length of the displayed doctor list.
- The given
SPECIALISATIONmust be a present specialisation of the specified doctor. - Only one specialisation can be deleted at a time.
Examples:
- Entering
list_dfollowed bydelete_tag_d 2 t\Orthopaedicdeletes theOrthopaedicspecialisation from the 2nd doctor in the doctor list. - Entering
find_d Jonathanfollowed bydelete_tag_d 1 t\Orthopaedicdeletes theOrthopaedicspecialisation from the 1st doctor in the resultant doctor list of thefind_dcommand.
Back to Doctor Management Features.
Editing the remark of a doctor : remark_d
Allows you to edit the remark of a specified doctor in the system. The doctor’s remark is usually used to indicate the doctor’s availability.
Format: remark_d INDEX [r\REMARK]
- Edits the remark of the doctor at the specified
INDEX. - The index refers to the index number shown in the displayed doctor list.
- The index must be a positive integer (i.e. 1 to MAX_INT).
- The index should not be larger than the length of the displayed doctor list.
- The doctor’s existing remark will be overwritten with the input
REMARK. - An empty
REMARKinput will delete the previously stored remark. - Similarly, if the
REMARKparameter is not given, it will delete the previously stored remark.
Examples:
- Entering
list_dfollowed byremark_d 2 r\Doctor will not be in clinic until 30/12/2023overwrites the existing remark of the 2nd doctor in the doctor list withDoctor will not be in clinic until 30/12/2023. - Entering
find_d Jonathanfollowed byremark_d 1orremark_d 1 r\removes the existing remark from the 1st doctor in the resultant doctor list of thefind_dcommand.
Back to Doctor Management Features.
Appointment Management Features
This is the list of features that help you manage appointment records:
- Adding appointment
- Listing appointment
- Viewing appointment
- Editing appointment
- Deleting appointment
- Adding a prescription to an appointment
- Deleting a prescription from an appointment
- Editing the remark of an appointment
Back to Table of Contents.
Adding an appointment : add_a
Allows you to add an appointment to the system.
Format: add_a pic\PATIENT_NRIC dic\DOCTOR_NRIC from\START_TIME to\END_TIME
Examples:
-
add_a pic\S9912343G dic\T0212385J from\2023-09-11 07:30 to\2023-09-11 08:00adds an appointment between doctor with NRICT0212385Jand patient with NRICS9912343Gfrom2023-09-11 07:30to2023-09-11 08:00. -
add_a from\2023-09-12 07:30 to\2023-09-12 08:00 dic\T0212385J pic\S9912343Gadds an appointment between doctor with NRICT0212385Jand patient with NRICS9912343Gfrom2023-09-12 07:30to2023-09-12 08:00.
Sample Usage:
-
Assuming you want to add an appointment between a patient “John Doe” with NRIC “T0212385J” and doctor “Betsy Crowe” with NRIC “S9912343G” starting from “2023-09-13 12:00” ending at “2023-09-13 12:30”.
- Enter the following command:
add_a pic\T0212385J dic\S9912343G from\2023-09-13 12:00 to\2023-09-13 12:30 - The result box will display the following message:
New appointment added: Patient NRIC: T0212385J; Doctor NRIC: S9912343G; From: 2023-09-13 12:00; to: 2023-09-13 12:30 - You have successfully added the appointment into the database.
Back to Appointment Management Features.
Listing all appointments, or by patient or doctor NRIC : list_a
Allows you to either display all the appointments in the system or the list of appointments of a specified patient/doctor in the system.
Format: list_a [pic\PATIENT_NRIC] [dic\DOCTOR_NRIC]
- If only
PATIENT_NRICis specified, all appointments belonging to the patient with the specifiedPATIENT_NRICwill be listed. - If only
DOCTOR_NRICis specified, all appointments belonging to the doctor with the specifiedDOCTOR_NRICwill be listed. - If both
PATIENT_NRICandDOCTOR_NRICare specified, all appointments between the patient with the specifiedPATIENT_NRICand the doctor with the specifiedDOCTOR_NRICwill be listed. - List all the appointments in the system if no fields are given.
Examples:
-
list_a pic\S9912343Greturns all the appointments that have the patient NRICS9912343G. -
list_a dic\T0212385Jreturns all the appointments that have the doctor NRICT0212385J. -
list_a pic\S9912343G dic\T0212385Jreturns all the appointments that have both the patient NRICS9912343Gand the doctor NRICT0212385J. -
list_areturns all the appointments in the system.
Back to Appointment Management Features.
Editing an appointment : edit_a
Allows you to edit an existing appointment in the system. This is useful to correct any mistakes made when adding or updating an appointment.
Format: edit_a INDEX [pic\PATIENT_NRIC] [dic\DOCTOR_NRIC] [from\START_TIME] [to\END_TIME]
- Edits the appointment at the specified
INDEX. - The index refers to the index number shown in the displayed appointment list.
- The index must be a positive integer (i.e. 1 to MAX_INT).
- The index should not be larger than the length of the displayed appointment list.
- At least one of the optional fields must be provided.
- Existing values will be updated to the input values.
Example:
-
edit_a 1 pic\S9912343G dic\T0212385J from\2023-09-11 07:30 to\2023-09-11 08:00edits the patient and doctor NRIC of the 1st appointment in the appointment list to beS9912343GandT0212385Jrespectively and the start time and end time of the appointment to be2023-09-11 07:30and2023-09-11 08:00respectively.
Sample Usage:
-
Assuming you want to edit the 4th Appointment, change the doctor NRIC from “S9823343G” to “S9923334G”.
- Enter the following command:
edit_a 4 pic\S9923334G - The result box will display the following message:
Edited Appointment: Patient NRIC: S9923334G; Doctor NRIC: S6912483J; From: 2023-09-09 10:30; to: 2023-09-09 10:45 - You have successfully edited the appointment at index 4 in the database.
Back to Appointment Management Features.
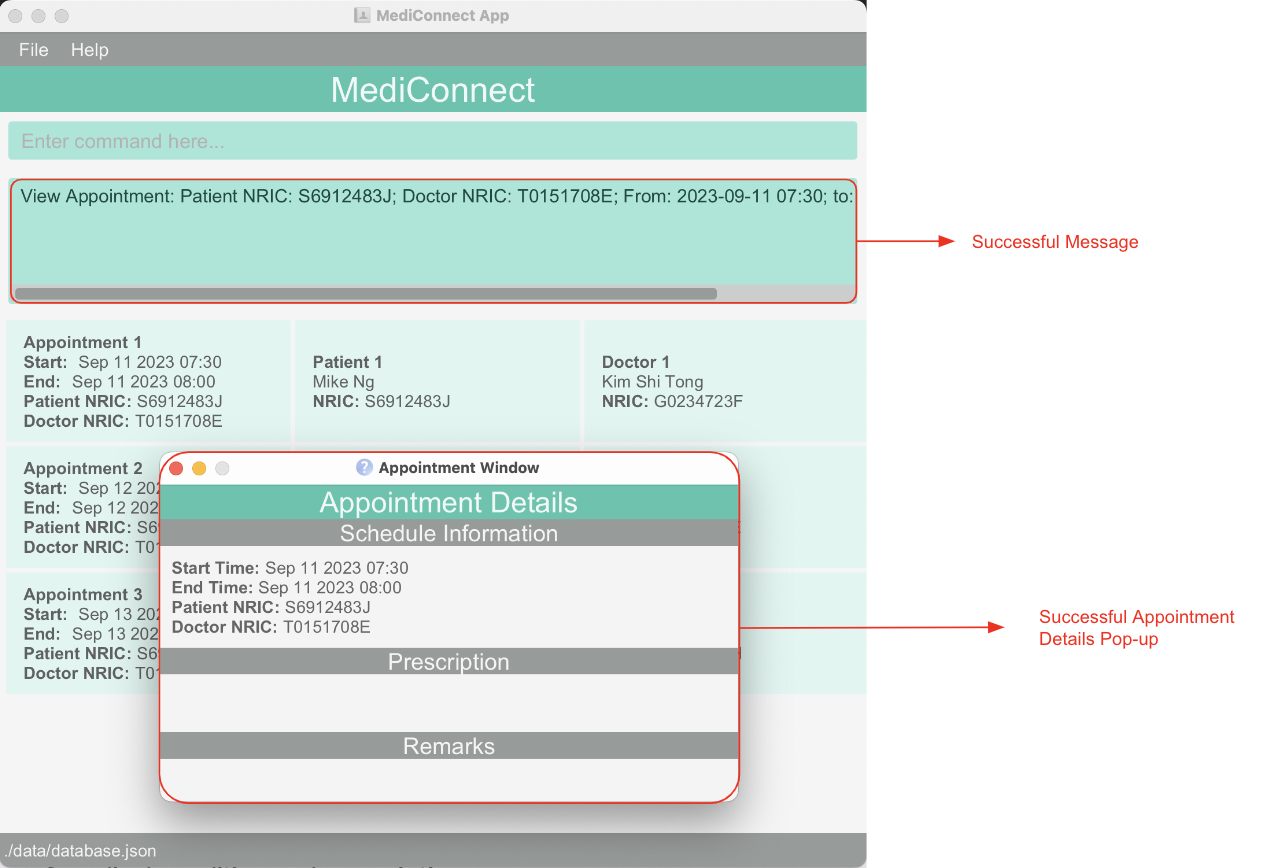
Viewing details of an appointment : view_a
Allows you to view details, such as basic information, prescription given, and remark, of a specific appointment in the system.
Format: view_a INDEX
- Displays the full details of the appointment at the specified
INDEX. - The index refers to the index number shown in the displayed appointment list.
- The index must be a positive integer (i.e. 1 to MAX_INT).
- The index should not be larger than the length of the displayed appointment list.
view_a to update the Appointment Window.Example:
- Entering
list_afollowed byview_a 2shows the details of the 2nd appointment in the appointment list.
Below is the image of a successful result that you should have encountered.
Back to Appointment Management Features.
Deleting an appointment : delete_a
Allows you to delete the specified appointment from the system.
Format: delete_a INDEX
- Deletes the appointment with the specified
INDEX. - The index refers to the index number shown in the appointment list.
- The index must be a positive integer (i.e. 1 to MAX_INT).
- The index should not be larger than the length of the appointment list.
Example:
-
delete_a 2deletes the 2nd appointment in the appointment list.
Back to Appointment Management Features.
Adding a prescription to an appointment : add_tag_a
Allows you to add a prescription for an appointment in the system.
Format: add_tag_a INDEX t\PRESCRIPTION
- Adds a prescription to the appointment at the specified
INDEX. - The index refers to the index number shown in the displayed appointment list.
- The index must be a positive integer (i.e. 1 to MAX_INT).
- The index should not be larger than the length of the appointment list.
- Only one prescription can be added at a time.
Examples:
- Entering
list_afollowed byadd_tag_a 2 t\Panadoladds thePanadolprescription to the 2nd appointment in the appointment list. - Entering
list_a pic\S9923334Gfollowed byadd_tag_a 1 t\Panadoladds thePanadolprescription to the 1st appointment in the resultant appointment list of thelist_acommand.
Back to Appointment Management Features.
Deleting a prescription from an appointment : delete_tag_a
Allows you to delete a prescription from an appointment in the system.
Format: delete_tag_a INDEX t\PRESCRIPTION
- Deletes the prescription from the appointment at the specified
INDEX. - The index refers to the index number shown in the displayed appointment list.
- The index must be a positive integer (i.e. 1 to MAX_INT).
- The index should not be larger than the length of the appointment list.
- The given
PRESCRIPTIONmust be a present prescription of the specified appointment. - Only one prescription can be deleted at a time.
Examples:
- Entering
list_afollowed bydelete_tag_a 2 t\Panadoldeletes the prescriptionPanadolfrom the 2nd appointment in the appointment list. - Entering
list_a pic\S9923334Gfollowed bydelete_tag_a 1 t\Panadoldeletes the prescriptionPanadolfrom the 1st appointment in the resultant appointment list of thelist_acommand.
Back to Appointment Management Features.
Editing the remark of an appointment : remark_a
Allows you to edit the remark of a specified appointment in the system. The appointment’s remark is usually used to record any comments the doctor would like to note for that particular appointment.
Format: remark_a INDEX [r\REMARK]
- Edits the remark of the appointment at the specified
INDEX. - The index refers to the index number shown in the displayed appointment list.
- The index must be a positive integer (i.e. 1 to MAX_INT).
- The index should not be larger than the length of the appointment list.
- The appointment’s existing remark will be overwritten with the input
REMARK. - An empty
REMARKinput will delete the previously stored remark. - Similarly, if the
REMARKparameter is not given, it will delete the previously stored remark.
Examples:
- Entering
list_afollowed byremark_a 2 r\Patient does not need any follow upoverwrites the existing remark of the 2nd appointment in the appointment list withPatient does not need any follow up. - Entering
list_a pic\S9923334Gfollowed byremark_a 1orremark_a 1 r\removes the existing remark from the 1st appointment in the resultant appointment list of thelist_acommand.
Back to Appointment Management Features.
General Features
This is the list of general features built into MediConnect:
Back to Table of Contents.
Viewing help : help
Shows a message explaining how to access the help page.

Format: help
Back to General Features.
Exiting the program : exit
Exits the program.
Format: exit
Back to General Features.
Saving the data
MediConnect data are saved in the hard disk automatically after any command. There is no need to save manually.
Back to General Features.
Editing the data file
MediConnect data are saved automatically as a JSON file [JAR file location]/data/database.json. Advanced users are welcome to update data directly by editing that data file.
Back to General Features.
FAQ
Q: How do I transfer my data to another computer?
A: Install the app on the other computer and overwrite the empty data file it creates with the file that contains
the data of your previous MediConnect home folder.
Back to Table of Contents.
Known issues
1. Refreshing the View Window after updating details
If you have any of the Appointment/Doctor/Patient windows opened, and you update any of the details of the selected appointment/doctor/patient, the view window will not reflect the changes. To refresh and see the updated details, run the respective view appointment/doctor/patient command again.
Back to Table of Contents.
Command summary
| Action | Format, Examples |
|---|---|
| Add Patient |
add_p n\NAME ic\NRIC p\PHONE_NUMBER e.g., add_p n\John Doe ic\T0212385J p\98765432
|
| Add Doctor |
add_d n\NAME ic\NRIC e.g., add_d n\John Doe ic\T0212385J
|
| Add Appointment |
add_a pic\PATIENT_NRIC dic\DOCTOR_NRIC from\START_TIME to\END_TIME e.g., add_a pic\S9912343G dic\T0212385J from\2023-09-11 07:30 to\2023-09-11 08:30
|
| Delete Patient |
delete_p INDEXe.g., delete_p 1
|
| Delete Doctor |
delete_d INDEXe.g., delete_d 2
|
| Delete Appointment |
delete_a INDEXe.g., delete_a 3
|
| View Patient |
view_p INDEXe.g., view_p 1
|
| View Doctor |
view_d INDEXe.g., view_d 2
|
| View Appointment |
view_a INDEXe.g., view_a 3
|
| Edit Patient |
edit_p INDEX [ic\NRIC] [n\NAME] [p\PHONE]e.g., edit_p 3 ic\T0212385J n\Joe Ng
|
| Edit Doctor |
edit_d INDEX [ic\NRIC] [n\NAME]e.g., edit_d 2 ic\T0212385J n\Joe Ng
|
| Edit Appointment |
edit_a INDEX [pic\PATIENT_NRIC] [dic\DOCTOR_NRIC] [from\START_TIME] [to\END_TIME]e.g., edit_a 2 pic\T0212385J
|
| Find Patient |
find_p KEYWORD [MORE_KEYWORDS]e.g., find_p James Jake
|
| Find Doctor |
find_d KEYWORD [MORE_KEYWORDS]e.g., find_d Jonathan Reese
|
| List Patient | list_p |
| List Doctor | list_d |
| List Appointment |
list_a [pic\PATIENT_NRIC] [dic\DOCTOR_NRIC] e.g., list_a pic\S9912343G
|
| Add Medical Condition |
add_tag_p INDEX t\MEDICAL_CONDTION e.g., add_tag_p 1 t\diabetes
|
| Delete Medical Condition |
delete_tag_p INDEX t\MEDICAL_CONDITION e.g., delete_tag_p 1 t\diabetes
|
| Add Specialisation |
add_tag_d INDEX t\SPECIALISATION e.g., add_tag_d 1 t\Orthopaedic
|
| Delete Specialisation |
delete_tag_d INDEX t\SPECIALISATION e.g., delete_tag_d 1 t\Orthopaedic
|
| Add Prescription |
add_tag_a INDEX t\PRESCRIPTION e.g., add_tag_a 1 t\Panadol
|
| Delete Prescription |
delete_tag_a INDEX t\PRESCRIPTION e.g., delete_tag_a 1 t\Panadol
|
| Edit Patient Remark |
remark_p INDEX [r\REMARK] e.g., remark_p 2 r\family history of diabetes
|
| Edit Doctor Remark |
remark_d INDEX [r\REMARK] e.g., remark_d 1 r\Doctor will not be in clinic until 30/12/2023
|
| Edit Appointment Remark |
remark_a INDEX [r\REMARK] e.g., remark_a 2 r\Patient does not need any follow up
|
| Help | help |
| Exit | exit |
Back to Table of Contents.